
How to Record Drums with UA Modeling Mics
Your step-by-step guide to pro drum sounds using simple mic setups.
You don’t need a ton of mics to get great quality drum recordings. Even just a few mics placed strategically across the kit can give you album-ready sounds with all of the vibe and mojo of a more complicated setup.
In this video, we'll show you how to record killer drum tracks using UA modeling mics in various configurations, from simple to more advanced.
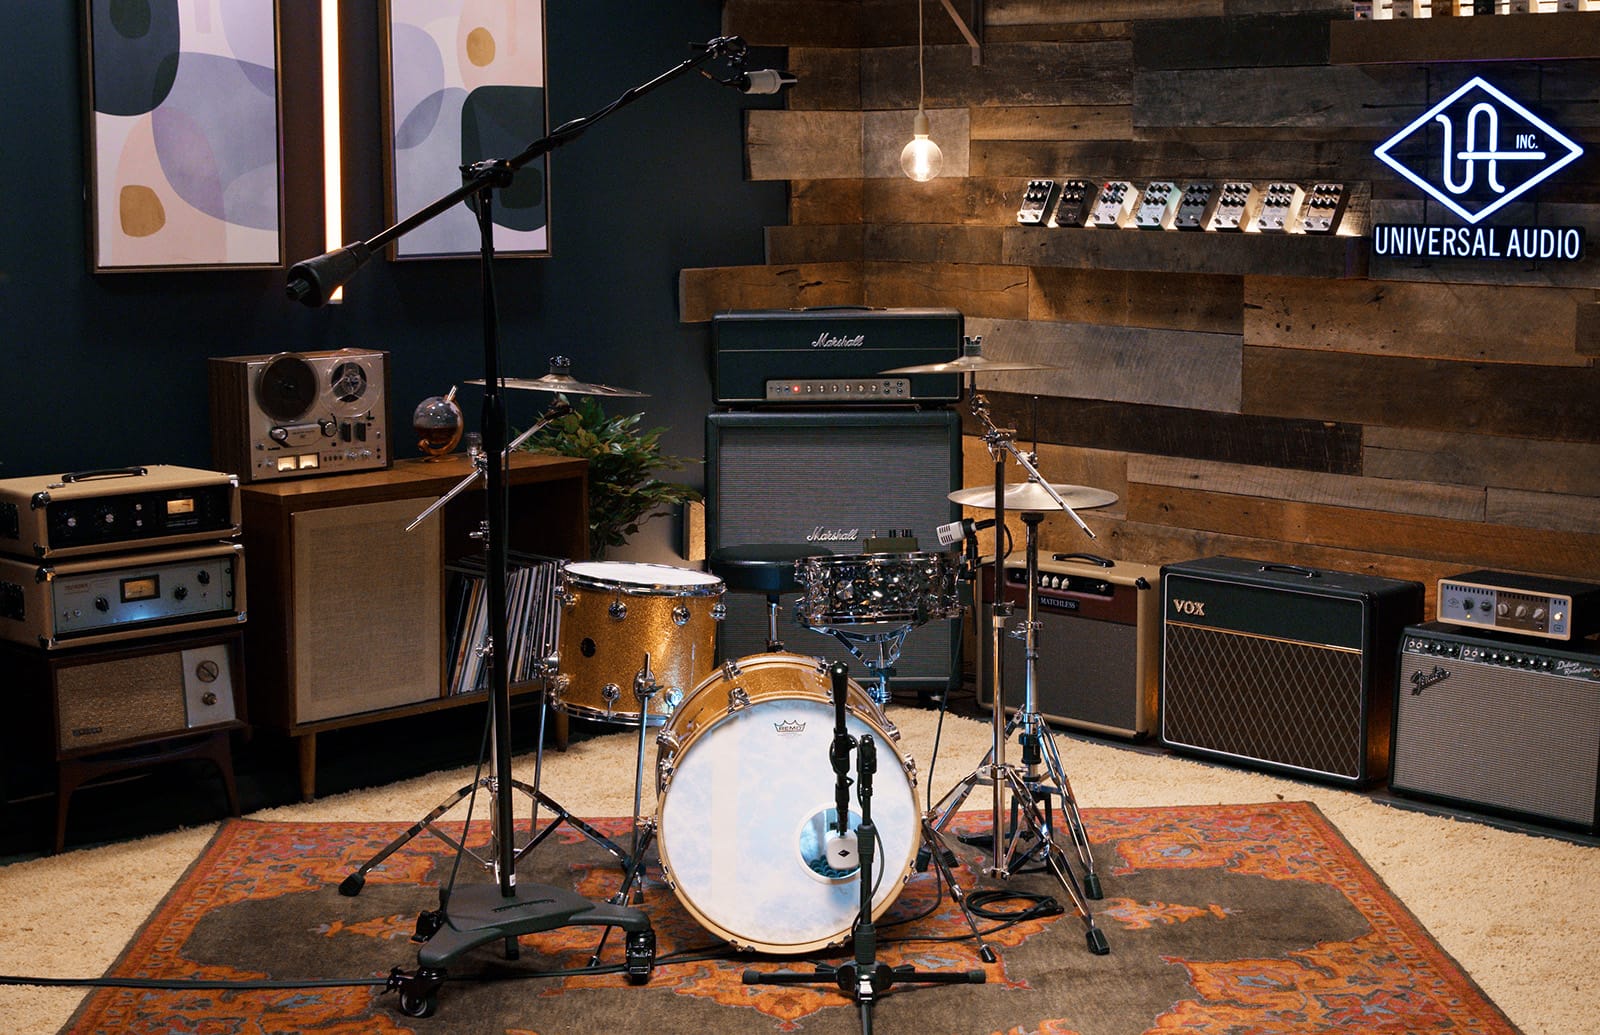
The Basic Three-Mic Setup
For this configuration we’re using an SC-1 large-diaphragm condenser as a mono overhead, an SD-5 dynamic mic on the kick, and an SD-3 dynamic mic on the snare.
The SC-1 captures the bulk of the kit’s sound, including the cymbals, while the SD-5 and SD-3 reinforce the kick and snare in the mix, ensuring they're the driving rhythmic force of the track.
This simple setup works well for genres like soul, funk, or breakbeats where you typically want a nice tight drum sound that carries the groove, without taking up too much space in the mix.
Quick Tip: If you only have one mic or single audio interface channel, the single SC-1 overhead gives you a usable drum sound, especially if you’re going for a vintage or lo-fi vibe.
For the kick drum, the SD-5 is placed just inside the resonant head, capturing the beater attack nicely while still picking up some of the body of the drum.
On the snare, the SD-3 is placed about an inch above the snare rim, pointed directly at the center of the drum and positioned so that the hi-hat is slightly behind the mic capsule for a little bit of isolation.
We’re still going to pick up a lot of the hi-hats in this snare mic but that’s totally fine for this kind of setup where we’re not close miking the hi-hat on its own.
This three-mic setup is easy to manage and works great for most styles.
Using Hemisphere Mic Modeling
Now these are modeling mics, so we also have the ability to use the Hemisphere plug-in to color these mics in different ways and change the sound of the kit as a whole.
This means that instead of having to set up and audition multiple mics to find the one you like, you can use a single modeling mic and flip through the different Hemisphere models to audition a whole range of sounds and pick the one that works best for the track.
In this case, we’ll use the LD-251 Hemisphere model for the overhead SC-1, the DN-6 model for the SD-5 on the kick drum, and the DN-57 model for the SD-3 on the snare — perfect choices for a more "modern" drum sound.

Adding Mics for Flexibility in the Mix
Next, let’s build on the previous setup by adding a couple of more mics that will give us some more options at mixdown.
The first addition we’ll make is adding a second SC-1 to form a pair of stereo overheads in a modified XY configuration.

Quick Tip: Keep the capsules of the two overhead mics relatively close to each other. This maintains "mono compatibility," meaning your recording will sound good whether the listener is using headphones, speakers, or even a phone.
Stereo overheads also let you capture cymbals more accurately — and with more separation — especially if the drummer is using multiple cymbals spread across either side of the kit.
We’re also going to add an SD-7 as a close mic on the floor tom, which gives us the option to bring out some articulation during fills or sections of the song that use the floor tom more heavily.

For the second SC-1 we’ll use the same LD-251 Hemisphere model as before, and for the SD-7 we’ll use the DN-421B model — a classic choice for big-sounding floor toms.
Dial-in your Hi-Hats
Looking for more control over the hi-hats while mixing?
Try adding a single SP-1 about six inches above the hi-hats, pointed towards where the drummer hits the hats with his stick, and positioned so that the crash cymbal is behind the mic’s capsule for more isolation.

Miking the hi-hats gives you more control over the placement of the hats within the stereo field, versus relying on the overhead and snare mics to pick them up.
Plus, you can tame the brightness of the other cymbals in the overheads with EQ, while still maintaining all of the sizzle and articulation of the hats.
Use More Mics to Fine Tune your Drum Mix
Finally, let’s round out this setup by adding a few more mics that will give the drums a larger-than-life sound while giving us more control over how each individual element of the kit sits in the final mix.
A classic trick for adding weight and body to kick drums is to use a sub mic — essentially a speaker wired in reverse to an XLR cable so it can be used to capture all of the low-frequency energy of the kick that the other mic doesn’t pick up.
Luckily for us, the UA SD-5 actually has a Hemisphere model that does exactly that!

So instead of ripping apart one of our speakers for its woofer, we’ll just place a second SD-5 a little farther back in front of the kick drum where the low frequencies have a chance to develop, and load up the DN-SUB model in Hemisphere.

By blending this second SD-5 in with the first one, we’re able to get a huge modern kick drum sound that you can not only hear, but feel.
Placing a "Character" Mic for Extra Tone
The last mic we’ll add is an SD-1 as a kit mic that we can beat up with some compression, EQ, and even distortion to add some punch and color to the drum mix.
The SD-1 is placed right in the center of the kit, equidistant between the kick, snare, and floor tom, and pointed directly at the drum throne.

In the final mix, this mic will be heavily compressed using a medium-to-fast attack, really sharpening the transients and making the drums pop.
Start off with it tucked pretty low in the mix, but don’t be afraid to experiment with its level to enhance the dynamics of your song.
For example, try automating it to be a little louder during the chorus to add more energy.
From simple to complex, now you have a few different mic setups to try on your next session. Have fun and don't be afraid to experiment!

En lire plus

UA's 2024 Holiday Gift Guide
Your one-stop-shop to find the perfect gift for your favorite music maker.

Choosing the Right Mic: Dynamic vs. Condenser Evaluated
Explore the differences between dynamic and condenser microphones in our comprehensive guide. Discover their distinct characteristics, applications, and find out which one suits your recording and live needs best.

Are Modeling Mics Good?
Dive into the world of modeling microphones and discover how Hemisphere modeling technology unlocks the sound of the world's greatest microphones.