Tips & Tricks — EMT® 140 Classic Plate Reverberator Plug-In
The EMT® 140 Plate Reverb, says legendary engineer Alan Parsons, was “virtually the only reverb we used on Pink Floyd’s Dark Side of the Moon.” As anyone who has ever donned a pair of headphones and settled into Dark Side’s glorious, astral ambiences can attest, it was a propitious decision to use Abbey Road’s EMT 140 on tracks like “Time” and “Eclipse.” Though really, in 1973, the EMT 140 — introduced only 15 years earlier by Wilhelm Franz and his team at Germany’s Elektro-Mess-Technik — was the only high-end reverb game in town. The company’s later all-digital EMT 250 Reverberator — the world’s first digital reverb — was still five years away from seeing the light of day.
Universal Audio’s EMT® 140 Classic Plate Reverberator Plug-In is stunningly accurate to the legendary unit’s character and class, and it will allow you to wield its mighty sonics without putting your back out hefting the original’s 600-pound sheet metal plate enclosures. It’ll also give you some definite advantages that the original units — including the three 140s from Sausalito, California’s The Plant upon which Universal Audio based their models — decidedly lacked. This allows you to be far more exact in calculating predelay and other values than you could on the originals.
While not a replacement for reading the UAD Users Manual, this article will look at several ways you can exploit UA’s EMT 140 plug-in, from basic setup and mix ideas to more adventurous, textural applications. Like Mr. Parsons, we’ll be building a song from scratch using the EMT 140 as our only reverb. Hopefully, it will encourage you to get the most out of this terrific plug-in, even if spending several hundred weeks on the Billboard Top 200 is not in your next album’s future!
Before we dive into the details, here's a listen to the final result:

Basic Setup
The classic setup for incorporating a plate reverb is to insert it into an auxiliary channel or bus send. Not only does this allow you to run several different instruments/channels through one instance of the EMT 140, saving DSP power, but it also encourages a spatial unity in your overall recording. Sure, you may use less of a given reverb plug-in on the drums as you might on, say, the strings, but giving several instruments varying tastes of the same basic reverb setting can help define your song’s ambience, and thus, its personality.
Any DAW — I use Logic Pro 9 — will have a send insert on each channel strip — simply call up an instance of the EMT 140 to a given bus channel. I start with bus 1 in my example, and will call up that bus whenever I want to use the same settings on another channel. This allows you to play with the amount of effect via the channel’s bus control dial.

You’ll generally want to set the EMT 140 to Wet/Solo whenever using it in this fashion. If, instead, you’re dedicating the EMT 140 to a single channel insert, deactivate Wet/Solo, which is the its default status, and set it to the desired Dry/Wet amount, using the Mix control in the lower right-hand of the GUI.
Full Frontal EMT
The EMT 140’s front panel includes several different controls, perhaps the most essential of which is the Reverberation Time (often called “decay”) controls.
As you’ll notice, there are, in fact, three different plate reverbs in the plug-in: A, B and C, each one with its own +/- damper control for increasing or decreasing the reverb time and decay. You can use the +/- buttons to tweak reverb time in smaller increments, or simply drag the red arrows inside the corresponding VU meters up or down.
Alternately, you can click on the View tab at the top of the GUI, and tweak the Damper/Reverb time there, enjoying a pinpoint numeric value for your preferred setting, represented in seconds. This view, called the "Controls View", is actually dependent on the music application you're using. Not all DAWs have the controls view, or it may function differently than the one I'm using in Logic.

You’ll quickly notice that each of the reverb plates has its own characteristics: A is the brightest of the three; B adds a bit more low end to the reverb tail; and C offers the most full-bandwidth response. These are good starting points for choosing which plate to use on different source material, but you’ve got a few more brushes in your palette as well, notably the EMT 140’s multi-tiered EQ controls.

section on
the EMT-140.
This was an included feature in the original EMT 140, but was difficult to access because you needed someone to run down and make any changes directly on the unit itself. The UAD EMT 140 plug-in makes it infinitely easier to roll low end off of the decay. Choose from either the original-style EMT filter roll-off (indicated in black text) or the later Martech retrofit-style filter (indicated in red text).
The EMT set are cut filters, and the Martech's are fixed shelf EQs, and both will help clean up any perceived muddiness in the low end. This is especially worthwhile when using the EMT 140 to effect a stereo drum kit performance. To keep the snare, toms and cymbals open while keeping the kick tight, you’ll want to find the sweet spot to shelve frequencies below, say, 180Hz, or even from 270Hz or 360Hz on down. This is subjective, but cleaning up low end reverberation is a sure way to minimize a muddy mix.
Panning For Gold
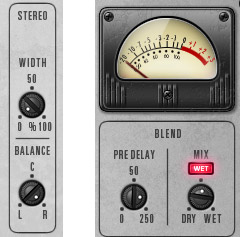
Another trick that’ll help open up your stereo field, as well as lend clarity to your signal, is panning the reverb tail. While the EMT is certainly a stereo effect, you can “downsize” it to mono by turning its Width control down to 0. (At 100%, the EMT is spreading its reverb goodness as widely across the stereo spectrum as it can.)

…and Pre Delay and Mix controls.
Once you’ve got it down to mono, pan your source channel in your DAW either hard left or right, and use the adjacent Balance control on the EMT to pan the reverb to the opposite side of your source material. It will increase the perceived effect if you set the Pre Delay control to a relatively high value, as the reverb tail will then “appear” just after the dry signal, creating a kind of soft double-tracked effect.
Another cool trick is to sync your pre delay time to the tempo of your track. In my example, the drums are at 97 beats per minute. I’ve got a separate instance of the EMT 140 on the drums, with a bright A plate, very little pre delay, and some EQ’ing to roll off low end. In fact, you’ll find that the UA preset Live Bright Drums is a good place to start tweaking.
I’ve also added the Studer® A800 Multichannel Tape Recorder Plug-In, the Teletronix® LA-2A Classic Leveling Amplifier Plug-In, and the SSL E Series Channel Strip Plug-In to help fatten the drums.

Check out the difference between the drums with no reverb, and then the drums with a short reverb tail and reduced low frequencies in the decay. Make sure to listen on your headphones or studio monitors in order to hear the full detail:
Using a delay time calculator — like the one available at sites like www.TheWhippinPost.co.uk –– I’ve calculated a 16th note delay to be at approximately 154 milliseconds. I’ve then set the pre delay for my Logic EVP88 Vintage Piano to that exact number, using the Control view. While a reverb pre delay is arguably too slight to hear as strongly rhythmic, it makes for a cleaner fit into the mix to dial it in correctly. Of course, you can always just use your ears — in this case my ears told me to work out the math and use Plate C on the piano for the widest possible bandwidth.

Check out the dry electric piano, and then listen to it with panned reverb and increased pre delay, in the below audio examples:
Using the Modulation Depth
One of the EMT 140’s hidden gems is its modulation function, which provides a subtle but unusually natural-sounding LFO warble to the reverb tail. You’ll have to turn up the Mod Rate and Mod Depth controls way up to really hear it, but even at lower levels it adds a softness to sounds that could otherwise be harsh. I love it on electric piano and guitar, though it could even soften up more brittle sounds like snare drums. The effect is subtle, but it adds real creaminess and luster to the mix. You can hear it on the piano in the previous audio example.

Sharing the Space
As I mentioned earlier, one of the nice things about sharing a single, or perhaps only two instances of a reverb like the EMT 140 is the unity it brings to your overall sound. Sure, it saves DSP power, but it can also cement the feeling you get when you enter a tune’s sonic realm. (Remember Dark Side of the Moon — one bloody reverb!) I chose to lay down some string parts, and it made sense to take advantage of the two instances of the EMT 140 I was already using.
The longer, warmer, higher pre delayed and modulated reverb I designed for my electric piano worked well for the whole notes and swells of my cello and viola parts as well. Meanwhile, the other shorter, brighter ‘verb with more low end roll-off made sense for my glassy, and sometimes more staccato high violin part, so I’ve added a good dose of both to my three tracks of strings, which I’ve soloed in the following audio example:

Another cool option would be to use DAW automation to gradually increase the reverb level on the strings — often called a “reverb build” — in order to create a heightened sense of drama as the piece develops. This would be impossible to do with the hardware because of the mechanical noise, but with the plug-in version, continuous automation of decay time works perfectly.
The Great 'Verb in the Sky
Aided by a little of the UAD Precision Multiband Plug-In, my Floyd-inspired mix sounds cohesive, and I was happy with the results. As for the shared sonic space of the EMT 140 Plate Reverb, well. . . let’s just say it eclipses all other plate reverbs.
Production Notes: The drums were constructed using beats and fills from Discrete Drums Rock Series 1, featuring drummer Greg Morrow. Learn more at www.SonomaWireWorks.com.
UA EMT Demo Track © Copyright 2011, by James Rotondi, RotoSongs, Ltd. (BMI) All Rights Reserved.
— James Rotondi
En lire plus
The Human Element
Learn how SOHN (aka TophTaylor), uses UAD plug-ins and his Apollo x8p interface for his ultra-textured laptop symphonies and how he learned to embrace the human element in his recordings.
Mumford & Sons on the Road with UAD-2 Live Rack
Mumford & Sons FOH engineer Chris Pollard details how he uses UAD-2 Live Rack and UAD plug-ins to shape the chart-topping group's string of sold-out shows.


